How to Build a Barbell Home Gym
Let’s say your goal is to build muscle, and you want to do it at home. If you don’t have a spare room or garage available, you can build a dumbbell home gym, and that’s great. But if you have room for it, a barbell home gym is the ideal way to train. You can do all of the best compound lifts, all of the best accessory lifts, and you can gradually add a little bit of weight to those lifts every workout. Not only that, but barbell training is by far the most efficient way to train. You’ll stimulate a ton of overall muscle mass with every repetition.
The problem is, building a barbell home gym can get confusing. I help people build muscle for a living and I still found it confusing. There are so many different brands, setups, and pieces of equipment. Even when picking a barbell, there are many different types, ranging from power to bars to weightlifting bars. And each type of barbell can have various coatings, ranging from zinc to cerakote.
So what we’ve done in this article is outline a basic setup that’s ideal for building muscle. Then we’ve recommended the best brands and pieces of equipment, going from the most affordable options to the best quality options. I’ll also show you my own barbell home gym and give you links to each piece of equipment I bought.
A Home Gym for Building Muscle
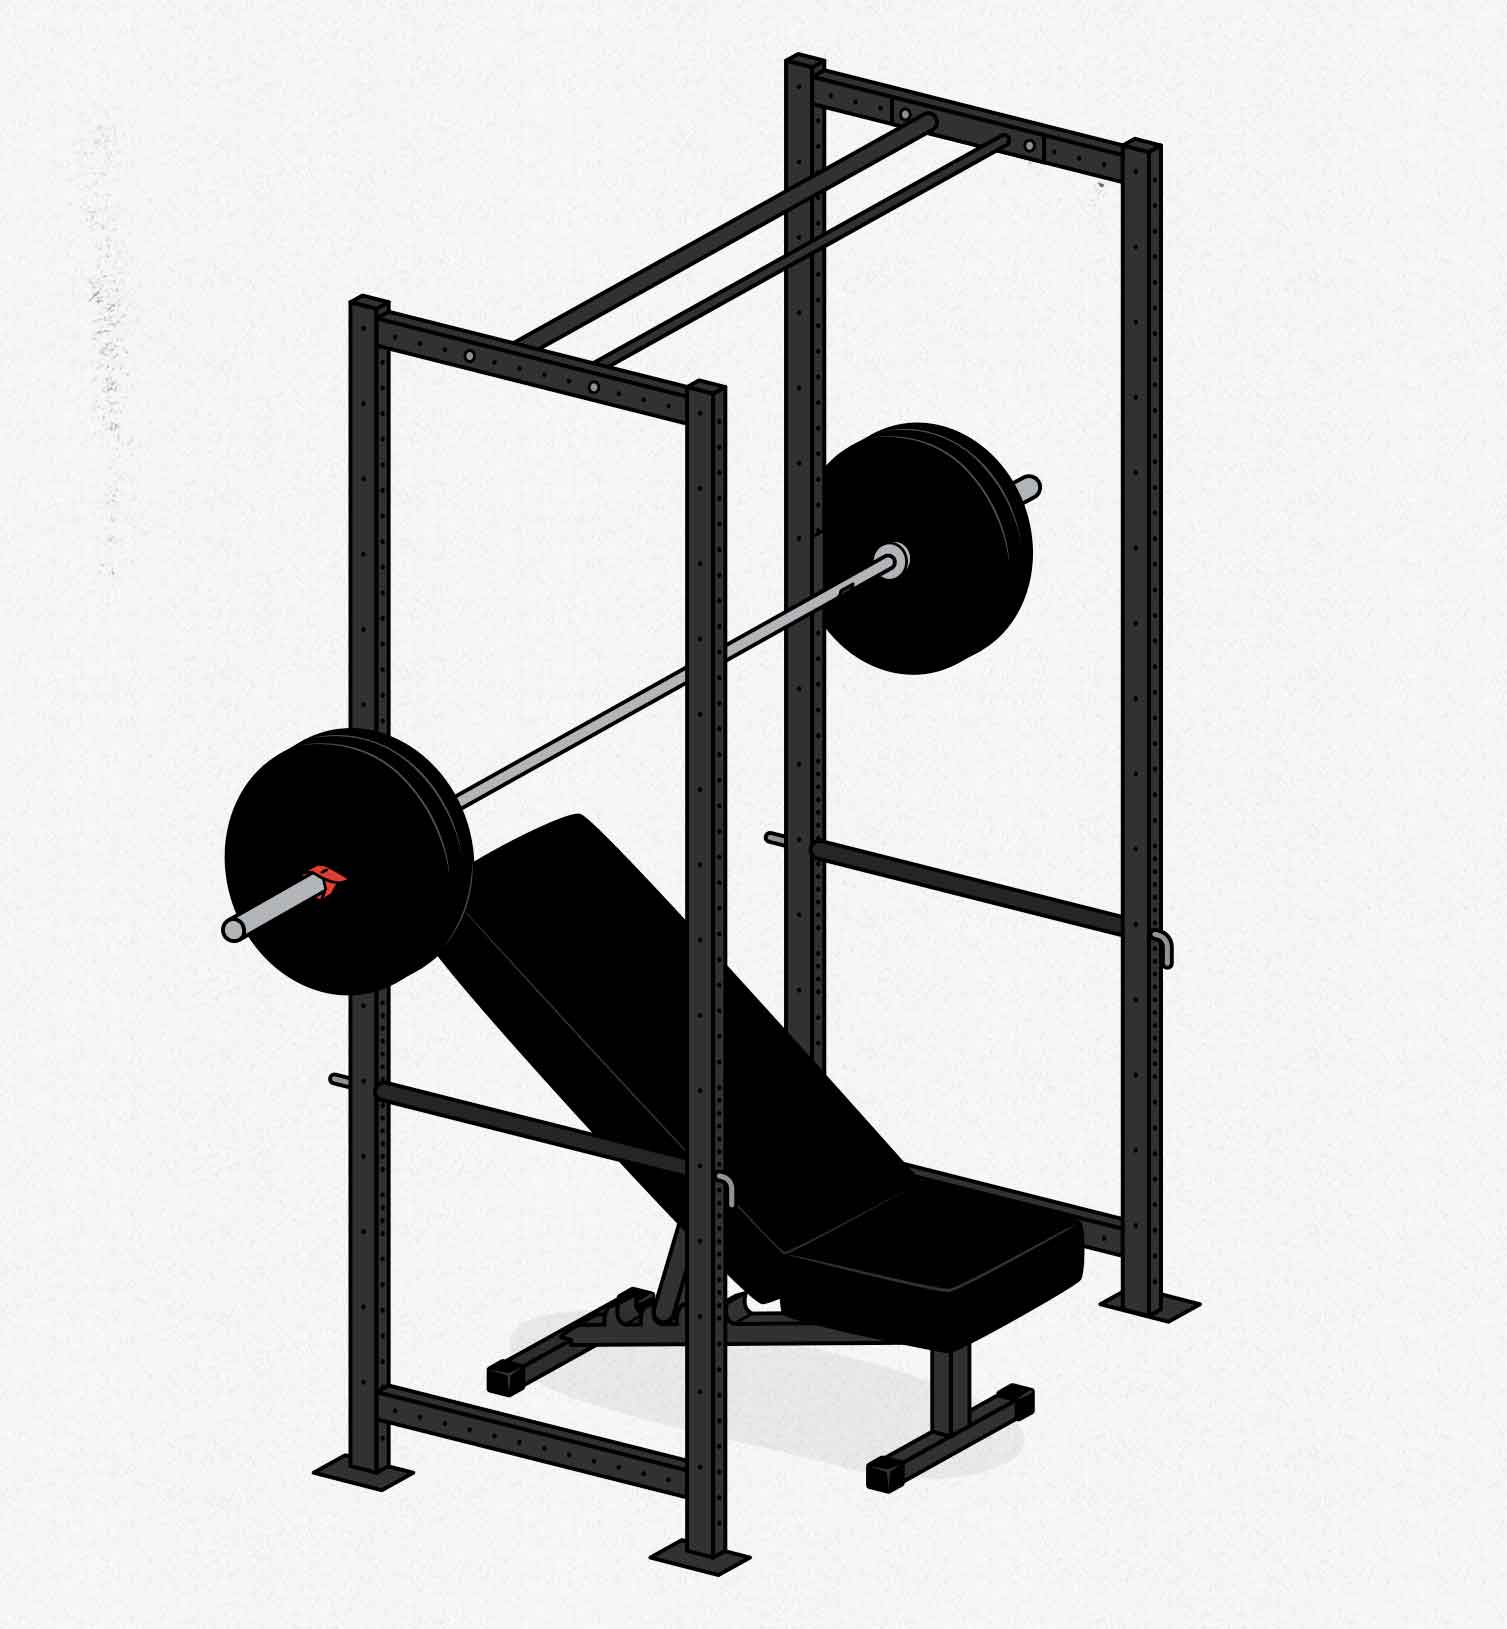
Your home gym should suit your goals. Before we start thinking about building a home gym, we need to figure out what your goals are and what lifts you’re trying to do. That way we can build a home gym that’s designed around your specific training goals. After all, a bodybuilder is going to need a very different home gym from a powerlifter.
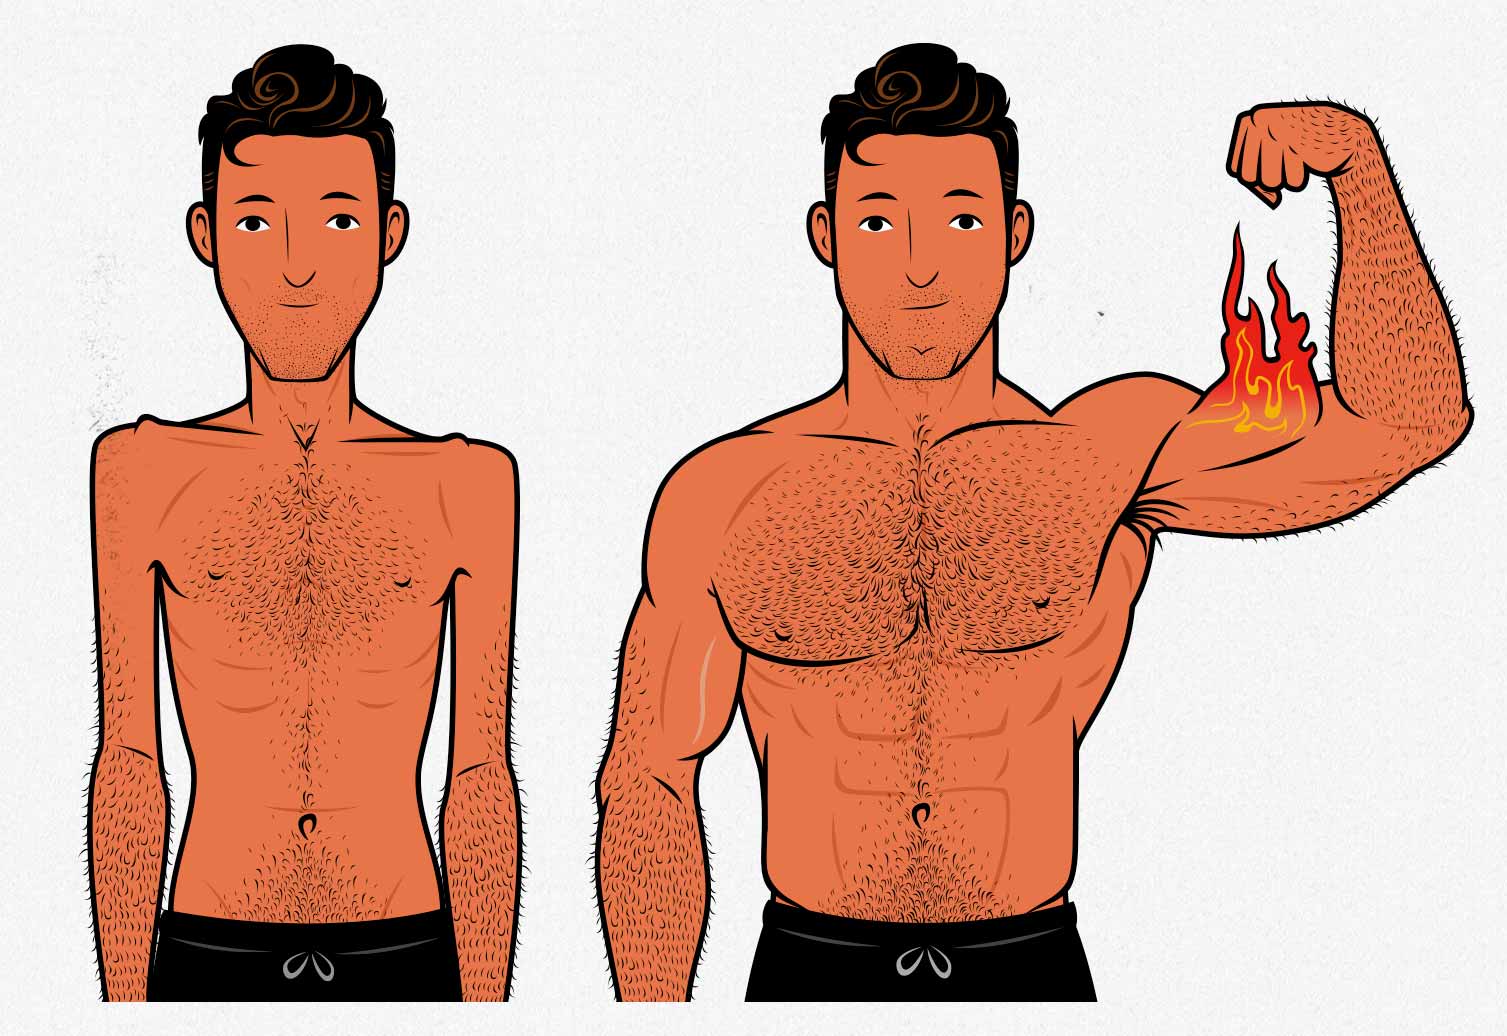
We’re assuming that your goal is to bulk up. So in this guide, we’re going to talk about building a home gym that’s perfect for becoming big and strong. It will also be great if you want to look better, feel better, perform better, improve your health. Those benefits can all come along with bulking up, provided that you do it right.
The “Big 5” Bulking Lifts
If you’re curious, we’ve got a full article about how you should be lifting to build muscle mass. But long story short, the foundation of any good bulking routine should be the big compound lifts. The big lifts allow you to stimulate hundreds of muscles at a time, making your workouts far more efficient, and also teaching you how to use a variety of muscles in conjunction with one another. For example, the overhead press trains nearly every muscle in your body, from your toes all the way to your fingertips, allowing you to stimulate a ton of muscle growth with just a single lift.
So if we want to build a great home gym for bulking up, we need to optimize it for the big compound bulking lifts:
- Squat: to build your quads, butt, and—if you’re doing front squats—your upper back.
- Deadlift: to build your hamstrings, butt, forearms, and—if you’re doing conventional deadlifts—your entire back.
- Bench Press: to build your chest, shoulders, and triceps.
- Overhead Press: to bulk up your shoulders, upper chest, and triceps.
- Chin-Up: to build your upper back and biceps.
These “Big 5” compound lifts cover every muscle group 2–3x over, building in a ton of overlap and assistance work.
Working your muscles with at least a couple different big lifts will stimulate a greater variety of muscle fibres, leading to greater strength and size gains, and helping your muscles look rounder and fuller.
For example, the chin-up will bulk up your upper back, which will improve your deadlifts and squats. Then your squats and deadlifts develop the core and hip strength that will help with your overhead pressing. And so on.
The Bodybuilder Home Gym
The good news is that even a very simple barbell home gym will allow you to do all the big muscle-building lifts safely and effectively. All you need are a few basic pieces of lifting equipment:
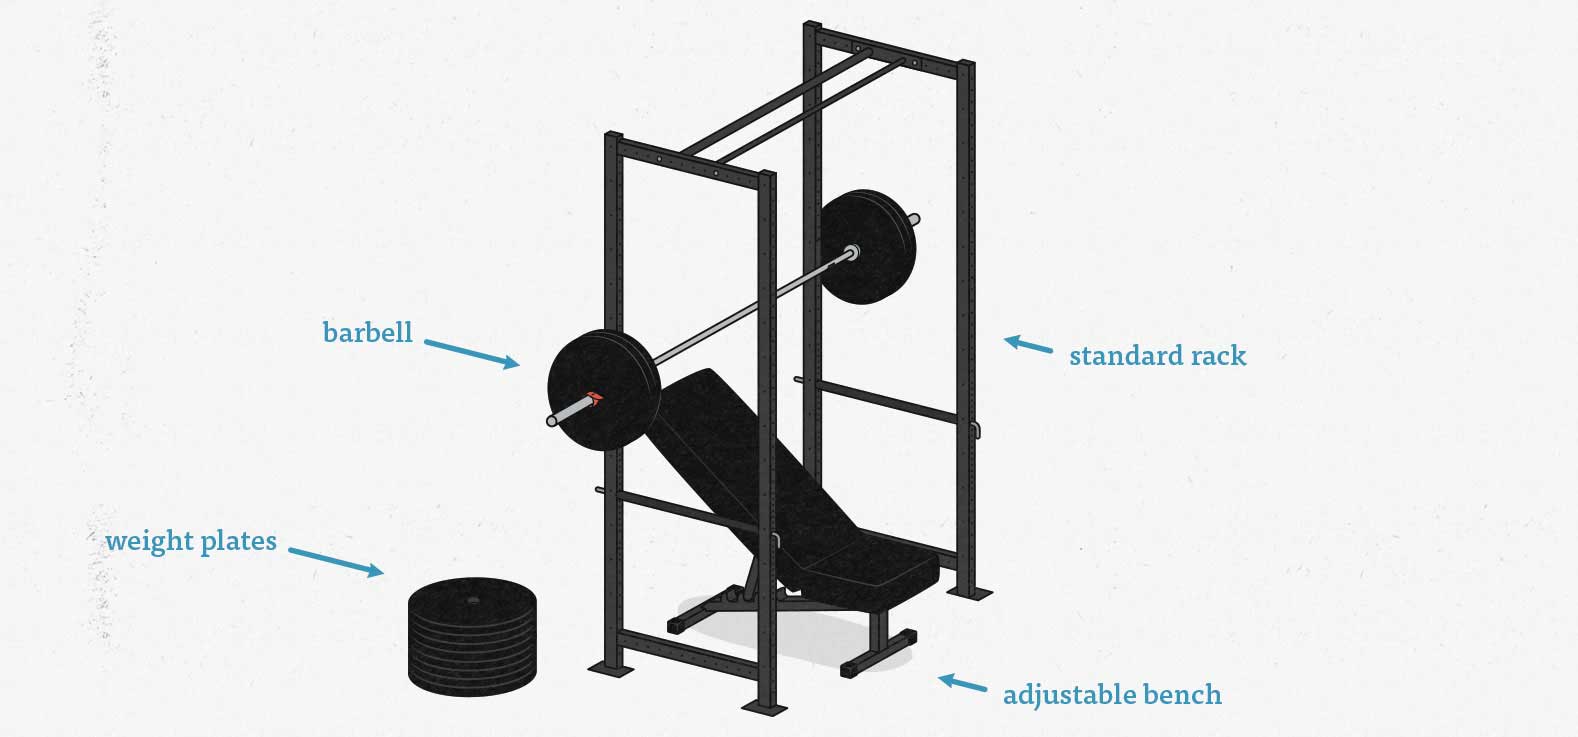
- A barbell and weight plates to allow you to lift progressively heavier weights
- A rack to hand you the weight and keep you safe while lifting
- A bench for doing horizontal lifts (such as the bench press)
That’s all you need. With just these four pieces of equipment, your home gym will help you get as big and strong as you like.
In fact, if you wanted an even simpler setup, you could ditch the bench, abandoning the bench press, and doing floor presses and weighted push-ups for your chest instead. Or if you wanted to build this out into a more versatile setup, you could add in some fun accessories, such as a dip bar, landmine attachment, or resistance bands. This gym starts simple but has room to grow.
Minimalism With Accessories
It’s also important to be able to do some accessory and assistance lifts for each movement pattern, such as barbell rows for your lats, barbell curls for your biceps, skull-crushers for your triceps, Romanian deadlifts for your posterior chain, and lateral raises for building broader shoulders. Fortunately, you can do all of those with a barbell and weight plates. (You can do lateral raises by holding weight plates.)
Is there an advantage to getting dumbbells and cables? Having access to more equipment can certainly help, but not significantly. For example, there are distinct advantages to both the barbell and dumbbell bench press, but both are quite similar. You can build your chest with either one. Besides, even with just a barbell, you still have access to plenty of different exercises for your chest:
- Different grip widths
- Different tempos (touch-and-go, paused)
- Incline bench press
- Floor press
- Push-ups
- Barbell push-ups
Plus, you’ll be doing the push press, which works the upper chest, and you’ll be using different set and rep schemes as you progress through your workout program. That’s more than enough exercise variation to build a large, full chest.
The Best Power Racks
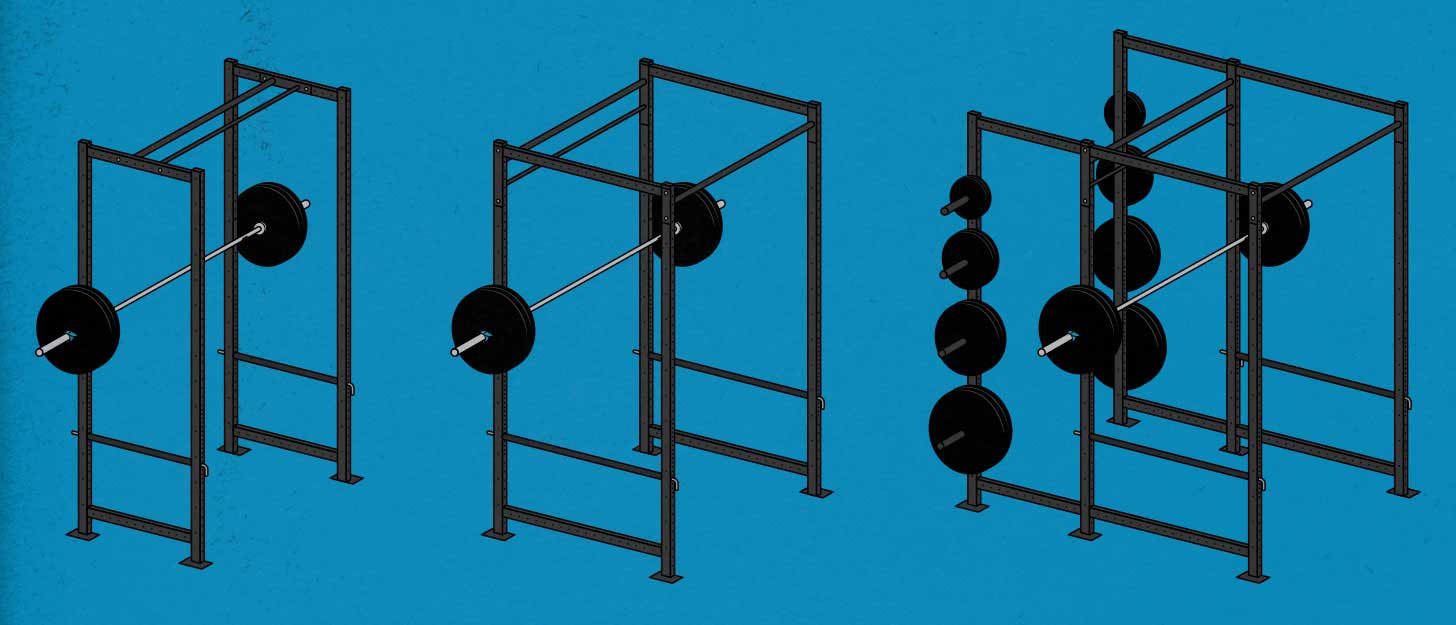
The first thing you’ll need is a good rack. There are a bunch of different types, but regardless of which you choose, it will probably have everything you need.
The Power Cage
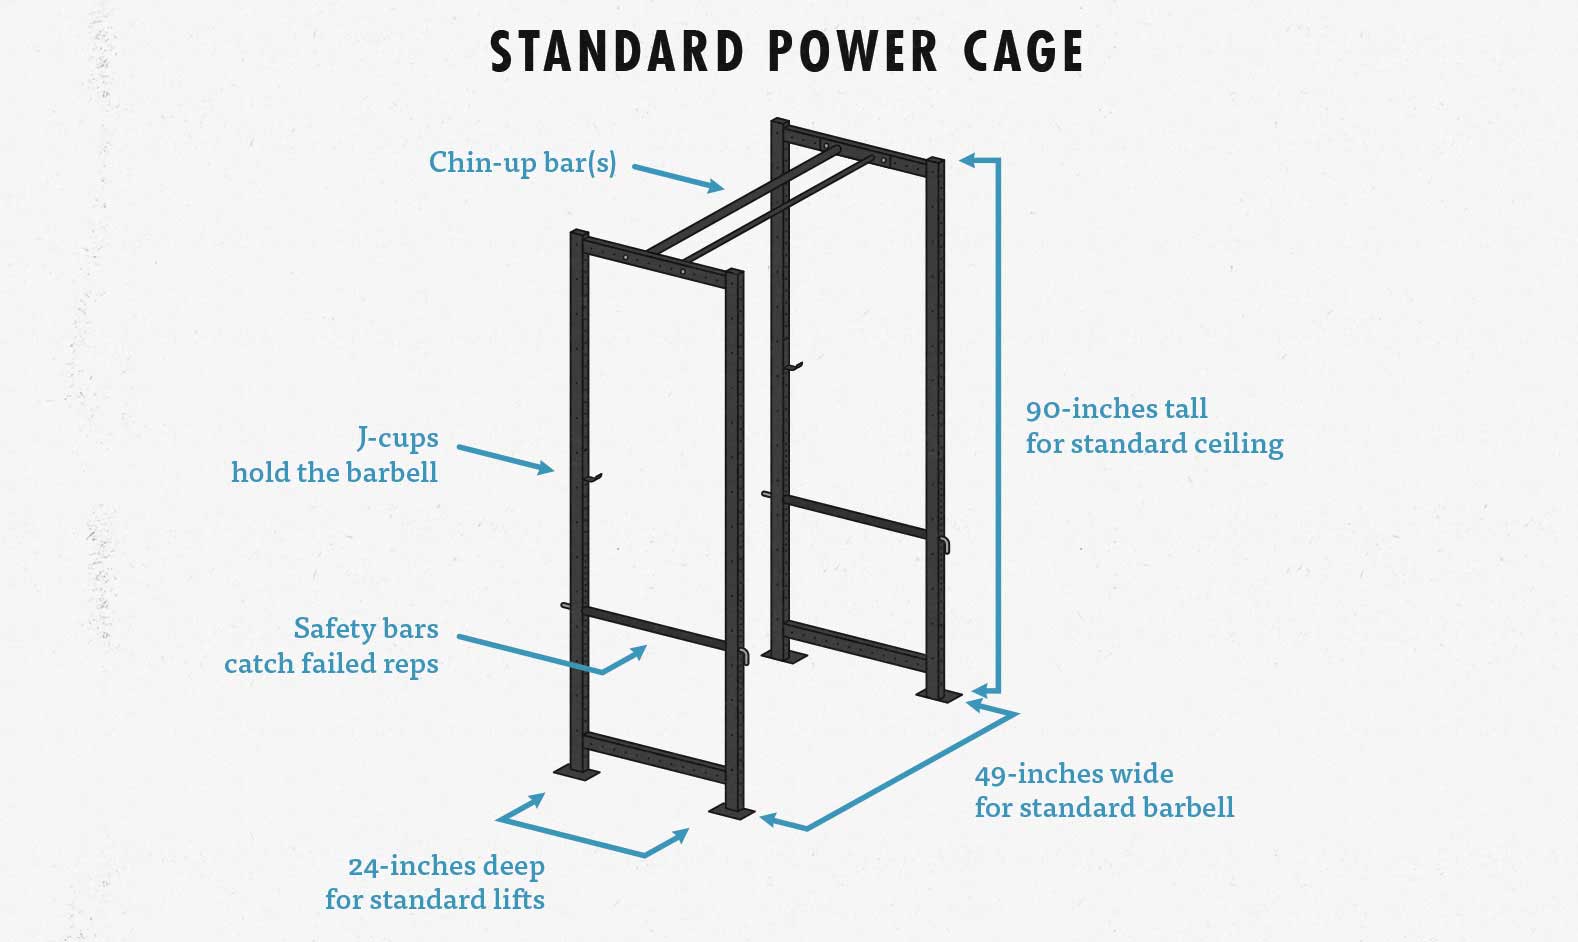
The J-cups will hand you the barbell at the correct height and the safety bars will catch the barbell if you falter, preventing you from getting pinned or injured.
These standard “power cages” are designed with powerlifting and strength training in mind, and they’re what you’ll see recommended for Starting Strength and StrongLifts 5×5 home gyms—and with good reason. They’re simple, sturdy, and versatile, and if they’re missing a feature that you want, you can just bolt it on. For example, if you want to do dips, you can bolt on a dip bar.
Technically, power cages are designed for strength training, and strength training isn’t very good for gaining muscle mass. However, a good bulking routine will also be based around the big compound lifts, meaning that power cages work just as beautifully for bulking up.
After all, a good bulking program is basically a strength training program done in slightly higher rep ranges, with a slightly higher volume, and with a little more upper-body work.
How to Bench Press in a Power Cage
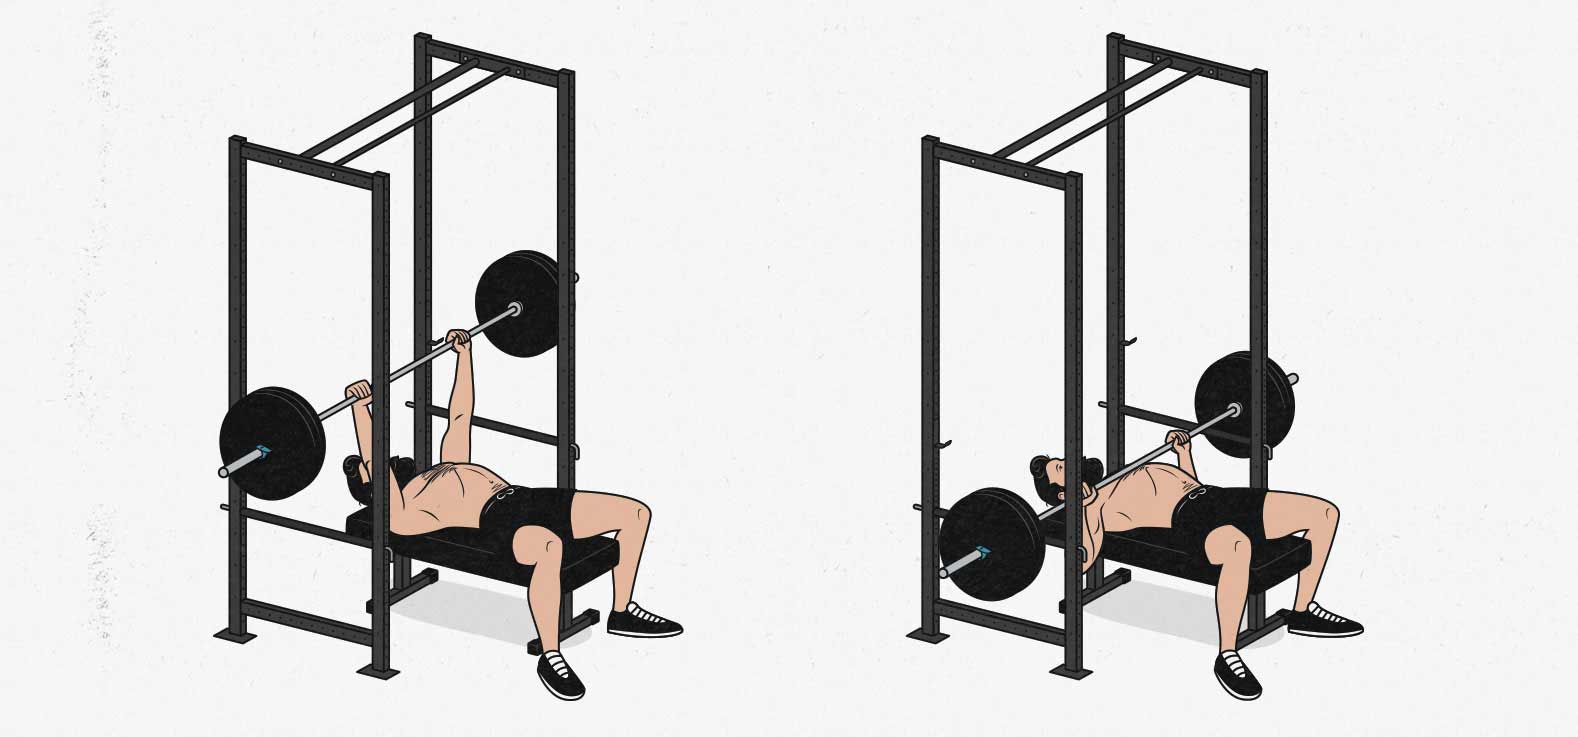
Power cages are famous for helping people squat safely, but they’re even better for helping people bench safely. After all, if you fail a front-squat or a high-bar back squat (which are the best types of squats for bulking up), then you can just dump the weight onto the ground. Dropping a barbell from your shoulders will be loud, and it might be hard on your equipment, but you aren’t in any real danger.
However, if you drop the barbell while bench pressing, you could chop your head off. It wouldn’t even be the clean sort of decapitation you’d see with a guillotine, it’d be the blunt messy kind. Fortunately, doing your benching of a power cage is the safest way to bench—even safer than using a spotter. After all, a spotter might fail to catch the barbell, whereas safety pins will not. This transforms the bench press from the most dangerous lift into one of the safest lifts.
To set up your power cage for bench pressing, lie flat on the bench and set the pins so that they’re just above your chest. When you get into position for your bench press, take a deep breath and arch your back, which will bring your torso up a few inches, raising it a couple of inches higher than the pins. This will allow you to bring the barbell down to your chest without the pins getting in the way. And if you fail a rep, just deflate your torso and wriggle out in shame.
Westside Hole Spacing
Westside hole spacing is designed to help you bench press alone. The hardest part of benching by yourself is that you need to un-rack the barbell by yourself. You’ll need to get into a stable position and then push it out of the j-cups without losing that stability.
It’s much easier to un-rack the barbell if you can set the j-cups at precisely the right height. To help with this, some racks will double the number of holes in the bench press area, which is called Westside spacing, like so:
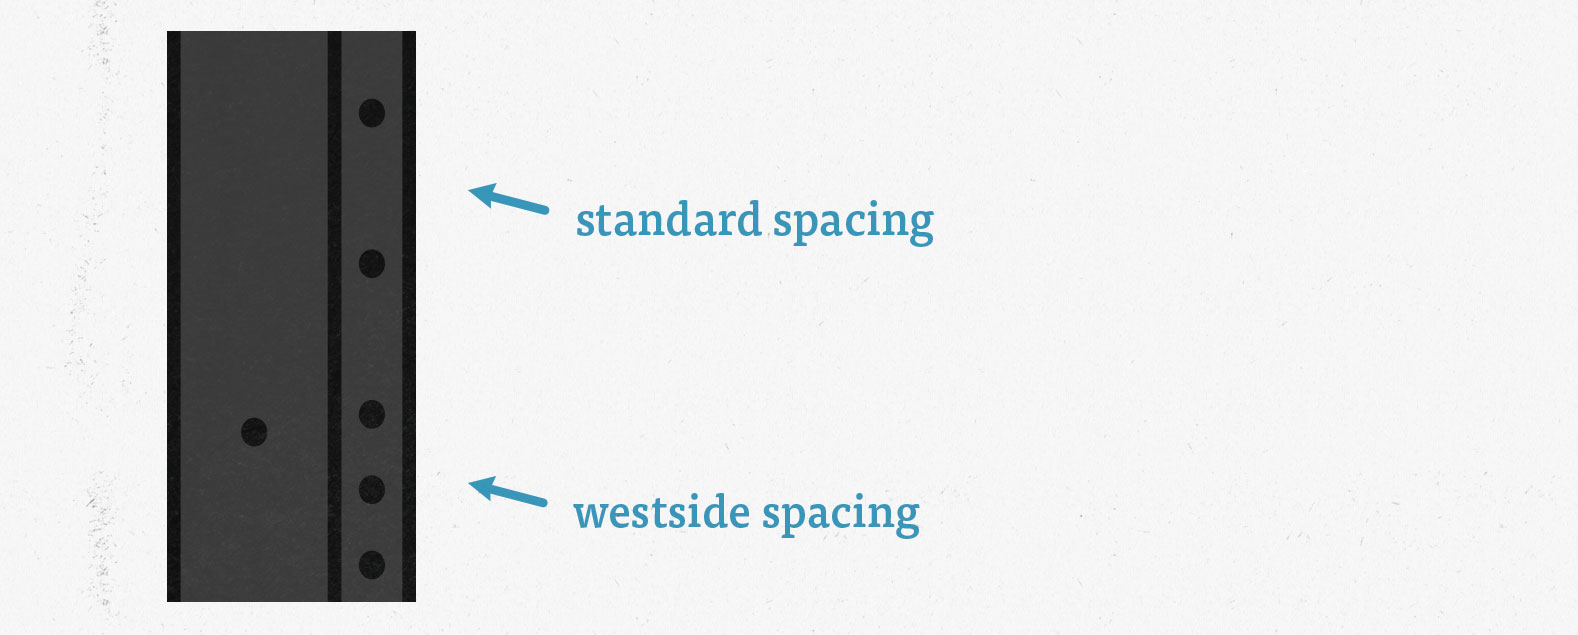
Westside spacing is by no means essential, but it’s a nice bonus feature to look for when choosing your rack.
Choosing a Chin-Up Bar
The chin-up bar. There are a few different types of chin-up bars, ranging from the standard “skinny” bar to the fancier chin-up bars with a dozen different angles. If you have finicky wrists or elbows, being able to pick comfortable angles can help. Even for the average guy, different angles means a greater variety of options available. However, a simple skinny bar is usually the best for building up your biceps, and it still allows for plenty of variety (narrow/wide grip, overhand/underhand grip).
I chose a skinny/fat bar, as shown in the illustration above. The fatter bar is great for bulking up skinny forearms, which was a great selling point for me, but it’s far from essential. A standard bar is fine.
Racks Must Be Robust
- It should be sturdy enough that you can lift without fear of it failing you
- It should have some sort of rust protection, such as a powder coat
- It should have protective plastic where the barbell makes contact with the rack, such as on the j-cups and safety pins so that your rack and barbell don’t wear each other out.
As you can see, you don’t need a fancy power cage, you just need a good power cage.
In fact, you could even go one step simpler, getting a squat stand with a chin-up bar and safety spotter arms.
The Squat Stand
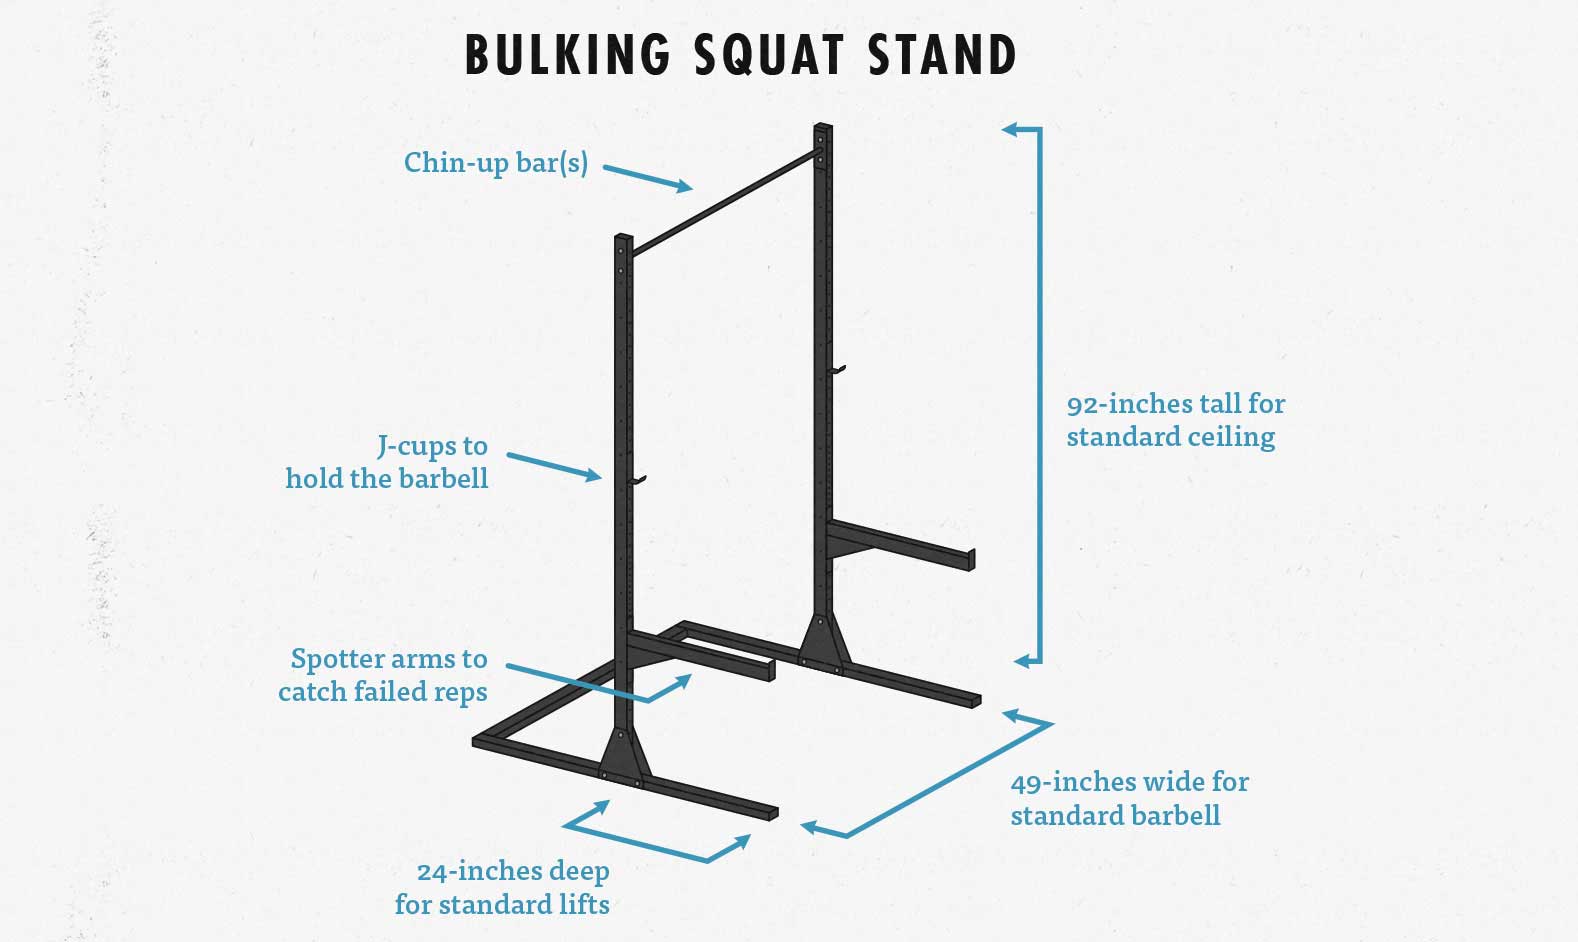
If you get a squat stand that has a chin-up bar and safety spotter arms, such as the one shown above, you’ll still be able to do the big bulking lifts safely and effectively, making it a worthy rival to the power cage.
A home gym built around a squat stand also has a couple of interesting advantages:
- Extremely stable design. The footprint extends a couple of feet on either side of the uprights, making it extremely stable even when it isn’t bolted to the floor.
- The open design makes it easier to navigate the barbell around. You can do a set of the bench press and then walk the barbell back a couple feel to do your rows or Romanian deadlifts, allowing you to do easy supersets. (Although with power cages, your barbell is racked out of the way of the chin-up bar, making it easy to superset your barbell lifts with chin-ups.)
The only major downside is that there’s nothing stopping you from falling backwards while squatting. Mind you, although many people fail while squatting, very rarely do people fall while squatting. Still, it can happen, and if it does, all of the valuables behind you will cease to be valuable.
On the bright side, the more dangerous lift is the bench press (due to possible decapitation), and bench pressing with safety spotter arms is perfectly safe up to 1000 pounds:
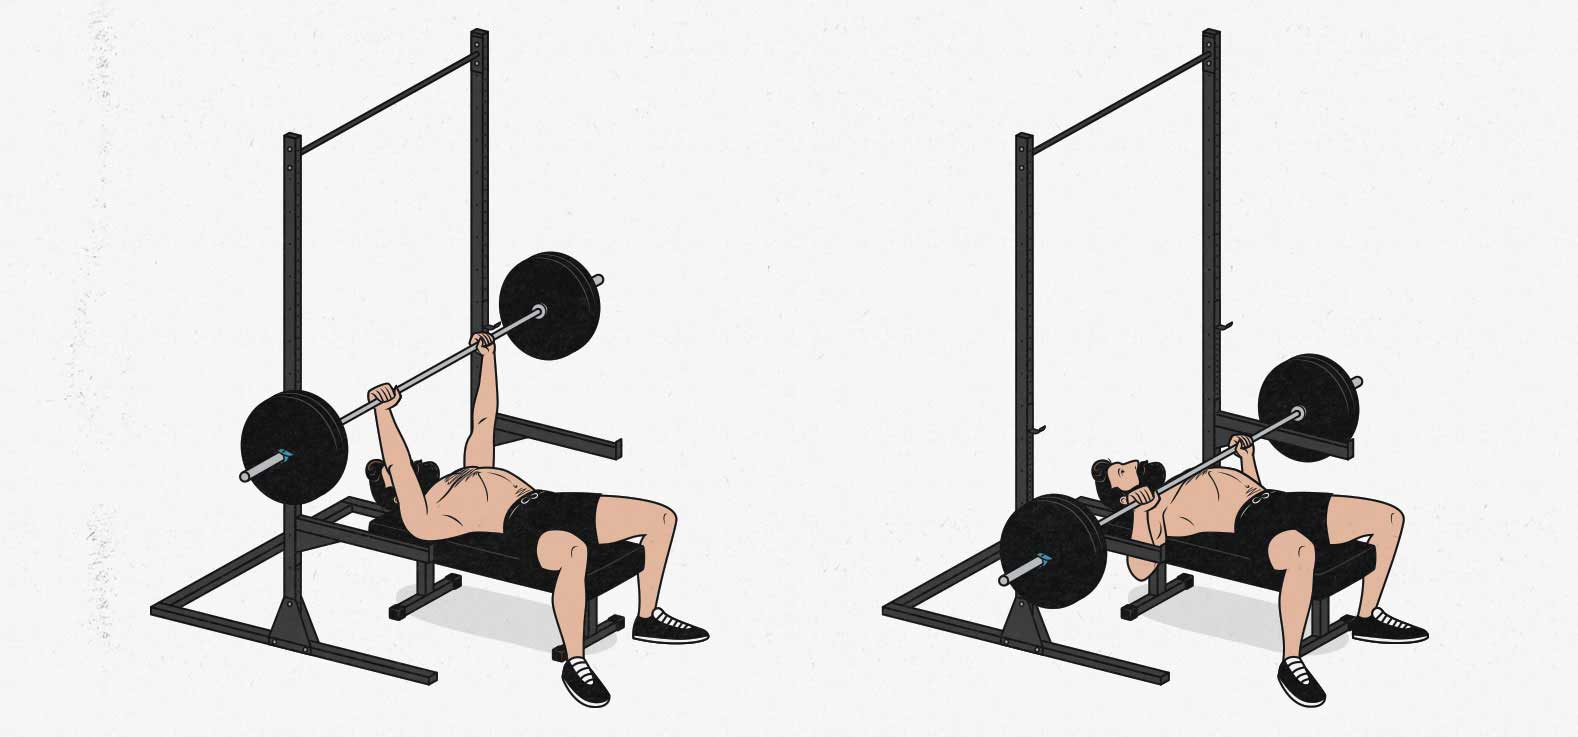
I spoke with the experts at Rogue, and they agreed that power cages and squat stands are both perfect for doing the big lifts so long as you use them properly. Narrower power cages often need to be bolted down, and lighter squat stands often need to be weighed down by plates.
Finally, if you can’t decide between a power cage and a squat stand, you could compromise and get a half rack.
The Half Rack
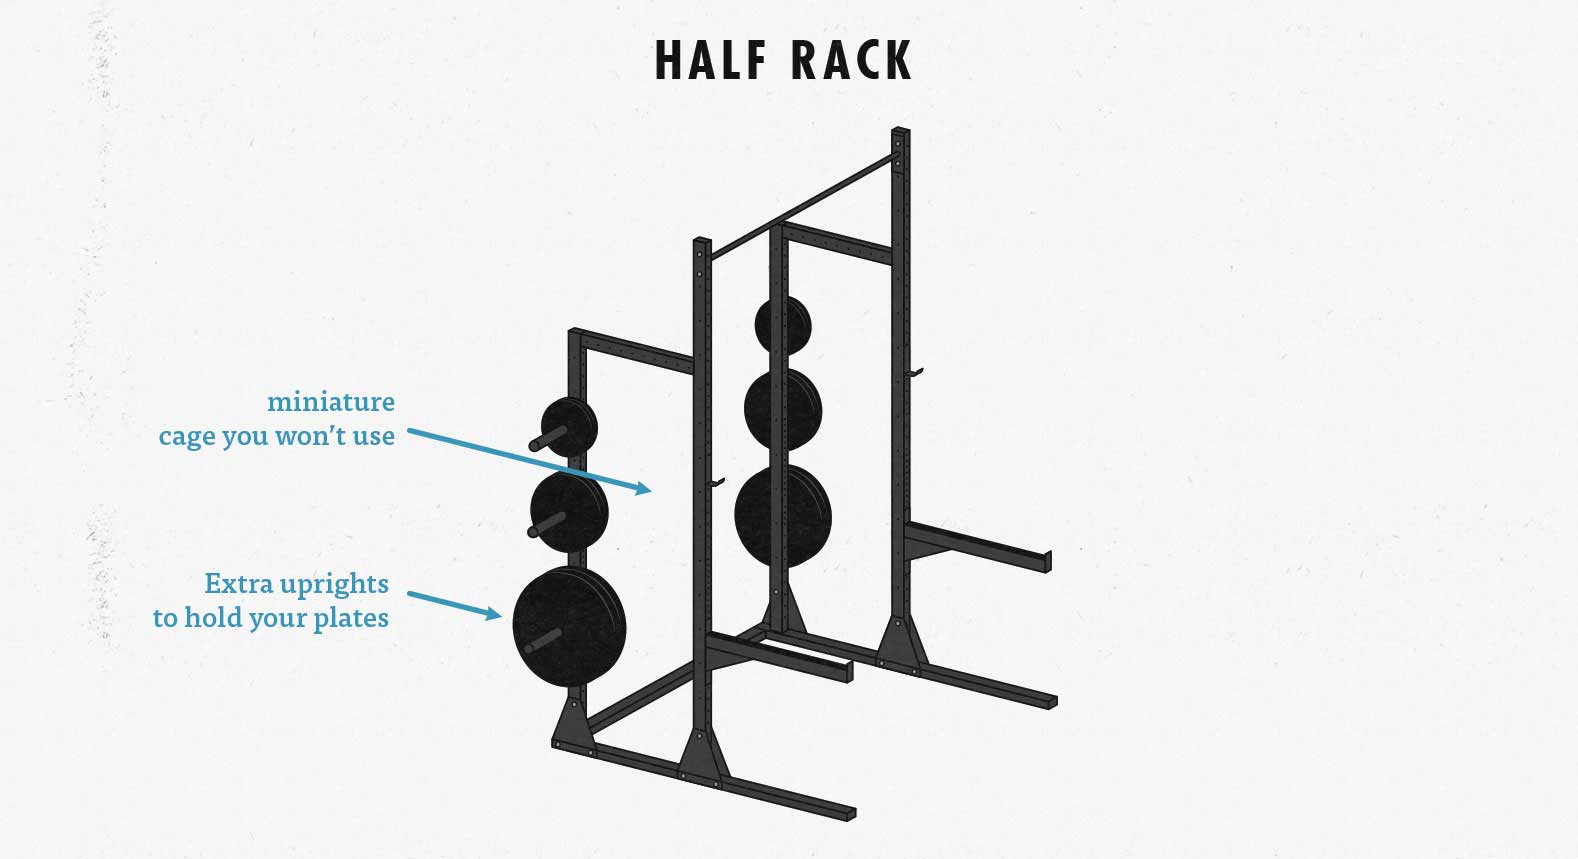
Half racks are the bastard stepchildren of power cages and squat stands. They’ve got an itty bitty power cage that’s too cramped to lift in, so you’ll wind up using a half-rack exactly like a squat stand.
Power racks are sturdier than squat stands, yes, but a good squat stand will allow you to squat up to 1000 pounds without issue, so the extra sturdiness doesn’t offer any practical advantage.
The main advantage of a half rack is that you can store your weight plates conveniently on the extra uprights, as shown above.
Power Cage, Squat Stand, or Half Rack?
Our default recommendation is building your home gym around a power cage. It’s the most popular option, and most lifting programs will assume that you’re using a power cage.
However, squat stands are equally viable so long as you get spotter arms and a chin-up bar. If you’re doing a lifting routine like the Bony to Beastly Bulking Program that starts with front squats (meaning that you won’t fall backwards), or if you’re a bit more experienced with back squatting, then I think this is a perfectly fine choice. It’s a little cheaper, a little more open, and you won’t need to bolt it down. (This is what I chose for myself.)
And, of course, if you can’t decide between a power cage and a squat stand, you can always get a half rack. Your half rack will function like a squat stand with built-in plate storage, which is nice. Just keep in mind that it will reek of compromise.
Whichever option you pick, you’ll be able to do all of the big lifts safely and effectively, allowing you to gain as much muscle and strength as you want. You can’t make a wrong choice here. Pick the option that gets you the most excited to lift.
Which Rack to Buy
Rogue makes the high-end racks at mid-range prices, making them the best choice if you can afford them. Great value. There are tons of companies trying to offer similar racks at a better price, such as Titan, but they can’t match the quality or the price of Rep Fitness, who rule at the lower price ranges.
- Rogue’s R3 Power Cage ($695): This is the classic power cage. It’s made in America and ships internationally. The quality is great, it will last a lifetime, it doesn’t take up much space, and it has a sleek ectomorph build (2×3″ uprights). It’s simple, but every detail is done right, from the hole spacing to the welds to the powder-coat finish. (Keep in mind that it needs to be bolted to the floor.)
- Rogue’s S2 Squat Stand ($425): This is the perfect squat stand for bulking. It has all the advantages of Rogue’s R3 power cage, and this is what I personally chose to buy. Just make sure to get the safety spotter arms ($135) along with it, bringing the total to $555.
- Rep PR-1000 Power Cage ($289): This is a good budget power cage. It doesn’t have Westside hole spacing, but I like how it includes plate storage on the floor at the back of the cage, making it sturdy enough that it won’t need to be bolted to the floor. The main downside is that you can’t safely squat more than 700 pounds in it, so you wouldn’t be able to invite Chad Wesley Smith over.
- Rogue’s Monster Power Cage ($1200): This power cage has all the benefits of the R3, just with more of an endomorph build (3×3″ uprights) and a bunch of gnarly high-end customization options. For example, you can choose safety straps instead of safety pins, giving your barbell a softer landing spot. You can also choose sandwich j-cups, which cradle your barbell.
All of these options will be perfect for bulking up. You won’t ever outgrow them, either. No matter how big and strong you get, these will always be enough.
If you’re having trouble finding the right power cage for your home gym, feel free to ask for help in the comments.
The Best Barbell for Bodybuilding

Now let’s talk about the best barbell for gaining size and strength. I got pretty into this. I got four different barbells to test and compare. Starting simple, what you’re looking for is a good quality barbell with a 2-inch-diameter spinning sleeve. These spinning sleeves were designed to help lifters do Olympic lifts, so you’ll often hear them referred to as Olympic barbells. Since then, though, three main barbell variations have evolved:
Olympic barbells, designed to be perfect for the snatch, clean and jerk.- Power barbells, designed to be perfect for strength training.
- Multipurpose barbells, designed to be solid for everything.
The Olympic lifts aren’t good for gaining muscle mass, so we can ignore those barbells. Both multipurpose and power barbells are great for bulking up, though. I bought both of them to compare and contrast. Let’s quickly go over their features, starting with the power bar.
Strength Training Barbells

Power barbells are designed to be sturdy and grippy, allowing you to transfer your full force into your lifts. This makes the power bar perfect for both strength training and bodybuilding. It’s fantastic for building muscle.
- The aggressive knurling makes it easier to hold onto the barbell. Knurling is the crosshatch pattern that’s engraved into a barbell to make it easier to hold onto. All barbells have knurling, but the intensity varies quite a bit. Power bars are known for having incredibly rough knurling that makes it easier, albeit more painful, to hold onto the barbell. Your hands will toughen within a couple of weeks, but you’ll still get more wear and tear on your hands than with slightly milder knurling.
- The knurling in the centre of the barbell locks it in place while squatting. The easiest way to identify a power bar is to look for the patch of knurling in the centre of the barbell. This centre knurling was originally used for doing single-handed lifts, but nowadays it’s used to help the barbell grip your back while squatting.
- The rings mark the maximum bench press grip width you can use in powerlifting meets. We aren’t competitive powerlifters, but the rings still help us judge grip width while benching and rowing. For example, if you put your index finger around those rings, we’d call that a wide-grip bench press. (You’ll probably want to bench press a fair bit narrower than that to increase the range of motion, improving muscle growth.)
- The barbell is thick and sturdy. Power bars are thicker than other barbells, meaning that you can deadlift and squat heavy weights without the barbell bending and bouncing. It won’t make much difference until you start lifting more than 400 pounds, but even at lighter weights the extra sturdiness is reassuring.
- The sleeves don’t spin very well. But since we aren’t doing the Olympic lifts, that doesn’t matter anyway.
Overall, power barbells are ideal for both strength training and bulking up. The only downside is the knurling can be so aggressive that it beats up your hands.
Multipurpose Barbells

Multipurpose barbells are designed to be good for both strength training and Olympic lifting. If you’ll be doing a bit of both—and especially if you’re interested in CrossFit—then you’ll want to get one of these barbells instead of a power barbell.
Olympic lifts are absolutely terrible for stimulating muscle growth, so if you’re only interested in getting big and strong, you can skip right past this section. However, if you’re interested in improving your athleticism, doing some Olympic lifting mixed in with your strength and size training will help to improve your explosiveness.
- The knurling isn’t quite as aggressive. It’ll be easier on your hands at first, but it’ll be harder to hold the bar while deadlifting and rowing.
- No knurling in the centre. This is mainly a feature for CrossFitters who are doing high-rep Olympic lifting, but it will also reduce your risk of scraping your nose while overhead pressing. The downside is that the barbell won’t be as stable while squatting.
- It has both powerlifting and Olympic lifting rings, making it easier to grip the bar precisely while snatching, benching, and rowing.
- The barbell has a bit of flex to it. If you ever pull the barbell explosively or toss it onto your shoulders, that extra little bit of flex will soften the impact.
- The sleeves still don’t spin very well, but that still doesn’t matter.
I have both a standard barbell and a power barbell. Both are great. In some workouts, I’ll use both. The difference is small enough that it doesn’t much matter. My wife, though, prefers the milder knurling on the multipurpose barbell. If we had to get just one, we’d probably go with this one.
Barbell Knurling
If you’ve ever used a barbell at a commercial gym, you’re probably used to “hill” knurling, where mild knurling has been worn down into gentle mounds that feel smooth in your hands. The barbell doesn’t dig into your hands or scrape against your shins, but it will slip and slide out of your grip as you attempt to do your deadlifts and rows.

The average powerlifting barbell goes to the other extreme. The knurling is deep and sharp, like a range of mountains. It digs into your palms and tears into your shins, but it gives your hands something to grip onto. It’s brutally functional. It leaves you bloodied, but at least it gets the job done.

Then the engineers got involved and found a way to get the best of both worlds. They created “volcano” knurling by chopping the sharp tips off of mountain knurling. It’s a more complex manufacturing process, and the barbells are a bit more expensive, but volcano knurling grips better than mountain knurling while feeling much gentler on the hands.
Finally, we need to consider the scale of the knurling:

Standard knurling is quite fine, which makes it feel smoother, and makes it less likely to tear your skin. Aggressive knurling is quite large, which makes it much easier to grip but also makes it rougher on your skin. I’d recommend getting aggressive knurling. You’ll get used to the roughness within a couple of weeks, and you’ll forever have a barbell that’s much easier to lift with, which is the whole point.
Two companies have built their reputation around producing the best aggressive mountain knurling: Rogue Fitness and Kabuki Strength. We’ll recommend some of their barbells at the end of this section.
Barbell Durability
You’ll hear purists like Mark Rippetoe (from Starting Strength) recommend simple “bare steel” barbells. He likes how they feel in his hands, and he likes the rugged patina that it develops as the unprotected metal corrodes away. These barbells rust quickly, require constant maintenance, and age worse than a chain-smoker who doesn’t lift.
Here’s a simple chart showing the rust-resistance of various barbell finishes:

I recommend getting a barbell that has some sort of protective coating or finish. That way your barbell will take care of itself and last longer than you do.
You’ve got a few good options:
- Black oxide. This is how knights blackened their armour to protect it from rust. The barbell is still made out of pure steel, so the knurling will still feel great in your hands, and the oxidization process gives these barbells a distinct black finish. It’s not the best type of protection, but it’s enough to help your barbell survive in a climate-controlled home gym. The black oxide treatment will gradually wear away in the areas where you come into contact with the barbell, though, so don’t buy it expecting it to look new forever.
- Bright zinc. Bright zinc barbells are far more resilient than black oxide barbells, making them a great choice for people who aren’t lifting in climate-controlled home gyms. One criticism is that zinc is a plating applied on top of the steel, which can interfere with the feel of the knurling. The better companies are still able to produce a good zinc knurl, though, so it shouldn’t be much of an issue.
- Black zinc. Black zinc is another layer of plating that’s added on top of the bright zinc, making black zinc barbells about twice as resilient as bright zinc barbells. However, similar to black oxide barbells, the black zinc plating will gradually wear thinner as the bar ages, revealing the bright zinc underneath. It’s a durable bar, but it won’t look new for long.
- Nickel. Chris Duffin from Kabuki Strength brought nickel from the aerospace industry it into the barbell industry, creating the hardest barbells ever made. Having an especially hard barbell allows it to come into contact with your rack without sustaining any wear and tear. This is the most high-end option on the market right now.
- Cerakote. Cerakote is a recent invention developed by the firearm industry to protect guns against rust. People love it because it has near-perfect corrosion resistance, it gives the barbell a badass matte finish, and it comes in various colours. But though the coating is tough, it can chip off with metal-on-metal contact, especially when loading weight plates onto the sleeves. Perhaps the biggest disadvantage to cerakote, though, is that it’s applied like paint on top of the barbell, mucking up the knurling. Just a bit, but it’s noticeable.
- Stainless steel. This brings us full circle, back to uncoated steel. Unlike bare steel barbells, though, stainless steel has corrosion resistance built-in, making them far more durable.
Which barbell coating should you pick? Most serious lifters will tell you to get a stainless steel barbell and treasure it forever, passing it down to your children. I think that’s wise advice. However, zinc is incredibly popular because of how durable and effective it is at much cheaper prices. In the end, I wound up choosing a black zinc barbell because I love how they look and feel.
Which Barbell to Buy
There are brands like Eleiko that make fantastic barbells, but Rogue and Kabuki both make even better ones, and Rogue’s barbells are less than half the price. If you’re looking for an even cheaper barbell, Rep Fitness makes a decent barbell at a very low price.
- Rogue Ohio Power Bar—Zinc/Stainless ($285–395): This is the gold standard of strength training barbells. It’s made in America and ships internationally. The knurling is the best in the world, it will last a lifetime, and it comes in zinc or stainless steel (with chrome sleeves). You can also get it in black zinc.
- Rogue Ohio Bar—Stainless Steel ($445): This is the best multipurpose barbell on the market, and even though the knurling isn’t aggressive, it’s still lightyears better than the knurling on most barbells.
- Kabuki Power Bar—Nickel ($670): This barbell isn’t necessarily better than the Rogue barbell, but it’s the hardest barbell in the world, and it’s got a high-end nickel coating. It’s overkill, but it’s a work of art.
The Best Home Gym Weight Plates

Some lifting enthusiasts will tell you that you should buy a great barbell and then just get whatever cheap weight plates you can find. Their thinking is that the weights just hang off the barbell, so as long as they’re heavy, they’re doing their job.
The problem with that line of thinking is that cheap plates won’t fit snuggly on your barbell. They’ll rattle around and scratch up your sleeves. And the cheaper the weight plates, the less precise the weight is. You might wind up with one 45-pound weight plate that actually weighs 37 pounds and another one that weighs 53 pounds. You’ll still be able to gain muscle, but it’s going to be harder to make consistent progress. Plus, cheap cast-iron weight plates rust and crack.
On the other end of the spectrum, you have the colourful high-end plates that are finely calibrated to be accurate to within a few grams. These are designed for competitive powerlifters (calibrated steel plates) and Olympic weightlifters (competition bumper plates) who lift at a professional level and who need incredibly precise weight plates that mirror what they’ll be using in competition.
Calibrated Steel Plates

I’m normally of the opinion that if you have the money and you want to spend it, why not get the highest quality equipment, right? But even if budget isn’t a factor, these might not be the best choice for you, given the specific circumstances that they’re designed for:
- No lips or handles. These plates aren’t designed to be easy to use, they’re designed so that lifters can fit upwards of a thousand pounds on the barbell. The plain, thin plates have no lips or handles, making them inconvenient to carry around.
- These plates only fit high-end barbell sleeves. A high-end barbell will have a sleeve that measures 1.95–1.97 inches in diameter. These plates are designed to fit those barbells incredibly snuggly, so the hole measures a precise 1.98 inches. If you get a nice barbell—and you should—that won’t be an issue. However, these plates won’t necessarily fit onto storage pegs, either. They might not fit on your curl bars or trap bars, either. You’d be buying plates that only fit on a standard high-end barbell.
Unless you’re a competitive lifter, I’d recommend getting weight plates designed for training, not for competing.
Steel Weight Plates

Cast iron plates. These are the classic black metal plates. They’re affordable and ruggedly practical, but the quality varies tremendously from brand to brand.
The weight isn’t always precise and the holes aren’t always the right size, so with a little bad luck, you could wind up with a 45-pound plate that actually weighs 49 pounds and won’t fit onto your barbell. Or maybe you wind up with a 45-pound plate that really weighs 38 pounds and rattles around on your barbell as you lift.
Machined steel plates. Your next choice is machined steel. Instead of casting the iron, they use a machine to trim away the excess metal until it’s precisely the right weight. These aren’t as accurate as calibrated plates, but they’re accurate enough, and they come with some great features:
- They’re effective. The weight is precise (within 2% of the listed weight), allowing you to steadily increase the weight each workout. However, this precision means a higher price tag.
- They’re easy to lug around. The plates will have either a lip or a handle, making them easy to carry around.
- You can load the barbell very heavy. They’re thin enough that you can load up 700+ pounds on the barbell. This is why steel plates are so popular with powerlifters.
- They’re loud. Metal plates clank, bang, and rattle. That’s okay if you don’t mind the noise, but it might be a deal-breaker if you plan on lifting in the wee hours of the morning or later in the evening.
You’ll need a deadlift platform, though. If you want to deadlift with metal plates, you’ll need to build a deadlift platform to blunt the vibration that’s going into your hands and into your home’s foundation.
Bumper Plates

Bumper plates are made out of rubber, and you can get them in black or in colours. They were invented so that Olympic lifters could drop barbells from overhead without damaging their lifting equipment or their floors. There’s no reason to drop weight plates from overhead while bulking, but bumper plates have a few nice corollary features:
- Bumper plates are effective. They’ll fit snuggly on your barbell and they’re accurate to within about 1% of the listed weight, making them absolutely perfect for bulking up.
- The rubber helps to absorb impact, meaning that you won’t need to build a deadlift platform or worry about dropping the barbell.
- They’re quiet. The rubber plates won’t clang and bang around. This might allow you to lift in the early morning or late evening while your family is still sleeping.
- Rubber doesn’t rust. The metal in the middle of the plate might eventually show some signs of rust, but even then, bumper plates are incredibly easy to maintain.
- No lips or handles, so they can be a little harder to carry around two at a time. Great for your forearm muscles, though.
- Rubber is thicker than steel. You’ll only be able to fit 400–600 pounds on the bar. If you’re a beginner, even 400 pounds might sound like a lot of weight, but within a couple of years, you’ll probably be able to deadlift in the 400’s. Better to choose thinner, denser bumper plates that allow you to lift up to 600 pounds.
- If you buy bumper plates, make sure not to buy crappy ones. First of all, they’ll probably be too thick and bouncy. Second, they might have an intense rubber smell that persists for months and maybe even years.
How Much Weight Should You Buy?
If you’re just getting started lifting weights, I’d recommend getting at least 350 pounds. That’s going to allow you to do your heaviest lifts (the squat and deadlift) in the 4–10 rep range without issue for a couple of years.
As someone with a few years of lifting experience, I got 550 pounds, and it should be enough to last me quite a while longer. I’d love to deadlift 600 pounds one day, but that’s a long way away, and that has nothing to do with bulking. After all, even if I could deadlift 600 pounds for an all-out single, I’d still be doing my muscle-building sets with less than 500 pounds.
You need to be able to load the barbell in small increments. The next thing to consider is progressive overload. You don’t just need a lot of heavier weight plates, you also need to be able to adjust the barbell in 5-pound / 2.5-kilo increments. That way when you’re ready to add weight to the bar, you’re adding a weight that you can manage.
Micro-loading. In fact, I’d even recommend getting some fractional plates that let you increase the weight in 2.5-pound / 1.25-kilo increments. That way when you start to stall on the smaller lifts, such as the overhead press, bicep curl, and skull-crusher, you’ll be able to go up by even smaller increments.
Which Weight Plates to Buy
Ivanko and Troy make plates that are comparable to Rogue’s, but at a far steeper price. Cap Barbell makes plates that are cheaper than Rep Fitness, but the quality suffers for it. Here are your best options:
- Rogue Echo Bumper Plates ($525 for 350lbs): These bumper plates are guaranteed to weigh within 1% of the listed weight, they’re designed to be durable, and the rubber doesn’t smell. They’re also incredibly dense, with almost no bounce, and allow you to load up 600 pounds on the bar. They range in weight from 45 pounds down to 10 pounds, so you also need 5, 2.5 and 1.25-pound change plates ($105). What’s most impressive about these bumper plates, though, is the price. Normally bumper plates are far more expensive than metal plates, but these are competitively priced. I bought 550 pounds and I absolutely love them. Fantastic plates.
- Vulcan Bumper Plates ($520 for 340lbs): These are almost identical to the Rogue plates above, except that the steel insert is hooked into the rubber plate, making them more technically more durable. However, that durability doesn’t matter in the context of someone bulking up in a home gym. It’s more of a feature for someone who owns a CrossFit gym, where the plates are going to be dropped from overhead thousands of times per day. Still, though, these bumpers are good quality for a good price, and they rival the Rogue ones. Again, they range from 45 pounds down to 10 pounds, so you also need 5, 2.5 and 1.25-pound change plates ($105).
- Rep Fitness Equalizer Machined Plates ($480 for 345lbs): These are machined plates that are guaranteed weigh within 2% of the listed weight. Their manufacturing process makes them resistant to cracking, and they’ve been sandblasted and powder coated to protect against corrosion. These should offer a good balance between price and quality.
- Rep Fitness Cast Iron Plates ($305 for 355lbs): These are a good budget option. You can get a set ranging from 45 pounds all the way down to 1.25 pounds, which is perfect. Keep in mind that the weights aren’t guaranteed to be very precise. I would recommend weighing them and writing the true weight on the plates.
The Best Lifting Bench

When choosing a weight bench, there’s an unfortunate trade-off to consider. Flat benches are sturdier and more comfortable, but you can’t adjust the incline. Incline benches are more versatile, allowing you to do lifts like the incline bench press, but they’re wobbly and don’t work well.
Reasons to choose a flat bench:
- Sturdy and reliable
- No hinges jamming into your glutes
- They lie perfectly flat
- They’re much cheaper
Reasons to choose an adjustable bench:
- You can do the incline bench press
Yes, there are a couple of other lifts you can do with an incline bench as well, but the main reason people like them is for the incline bench press.
Does the incline bench press justify getting an adjustable bench? The incline bench press is a great lift, don’t get me wrong, especially if you’re new to lifting weights. New lifters often have poor shoulder mobility that prevents them from doing the overhead press for a few months. The incline bench press would allow you to build up your shoulders and upper chest right from day one.
However, by getting an adjustable bench, you’re going to make the flat bench press very uncomfortable, which is going to make building up your chest a real pain in the ass (because the hinges will jam into your glutes). It’s a brutal trade-off.
The landmine press might be a better option for new lifters. If you think that your shoulder mobility might limit you, consider getting a landmine attachment for your rack. A landmine attachment is cheaper and more versatile than an adjustable bench, and the landmine press is arguably better for your shoulders and upper chest anyway. For example, Rogue’s landmine attachment is just $95, compared to their adjustable bench being $545.
The Ideal Height for a Bench
One of the things you’re looking for in a bench is that it’s short enough that you can drive your legs into the ground while bench pressing. If the bench is too tall, you’ll be forced to balance on your toes, ruining your stability. Most guys prefer benches that are around 17 inches tall. Some taller guys prefer their benches to be 18 inches.
Which Lifting Bench to Buy
Adjustable benches are technically more versatile than flat benches, but that versatility comes with a huge cost, both financially and functionally. I’d personally recommend getting a flat bench and a landmine attachment. That way you can do your flat bench press properly while having a great option for building up your shoulders and upper chest.
- Rep Fitness Flat Bench ($169): This is the gold standard flat bench that’s been acing all of the reviews. It’s sturdy, has a wide and grippy pad, and it’s 17 inches tall, which is perfect for all but the tallest of guys. People also love how it has a tripod design, with just one leg in the front, giving you the freedom to position your feet however you like. There’s also a version with a wider pad, popular among competitive lifters with broader shoulders.
- Rogue Adjustable Bench ($545): This is the best premium adjustable bench… and if you’re getting an adjustable bench, you need a premium one. It’s sturdy and has a minimal pad gap. And it’s 17.5-inches tall, which makes it a little bit high for the bench press, but great for everything else.
- Rogue Flat Bench ($180): This bench is sturdy, durable, and welded together, removing any hint of wobble. The pad is flat, wide, grippy, and comfortable. The main downside for the average guy is that it’s 18 inches high. For taller guys, though, that’s an asset. (I’m 6’2 and chose this bench.)
- Rep Fitness Adjustable Bench ($209): This is an okay budget adjustable bench. It’s 17.5 inches tall, and it’s not that wobbly. It gets good but not great reviews. If you aren’t that strong yet, you might get good value out of it.
- Rogue Landmine ($95): If you’re getting a flat bench, this will add just as much incline pressing versatility to your home gym as an adjustable bench would, and without any worries of the bench being uncomfortable or unstable. (Note that this is made to fit on Rogue racks and squat stands.)
Home Gym Mats and Flooring
Rubber flooring and tiles: you don’t need a rubber mat or rubber tiles, but sometimes they can be more comfortable to stand on, they can stop things from sliding around, or they can buffer the impact from dropped weights.
When it comes to choosing a mat for your home gym, you don’t want the foamy yoga stuff, you want an extremely dense mat, such as a horse stall mat. Horse stall mats are designed for massive horses to clonk their metal feet around on, which just so happens to be similar to lifting weights. You might have some good local options available there.
Lifting companies usually have a few options available, too. For instance, Rogue offers rubber tiles.
Do you need a deadlift platform? Bumper plates are specifically designed to buffer impact, making them great for lifts like the deadlift. So if you’re lifting on concrete with bumper plates, no problem—you’re fine. Besides, I’d recommend lowering the barbell fairly slowly and gently while deadlifting. Resisting the weight on the way down will give your muscles quite a bit of extra time under tension, helping you build more muscle.
But if you get metal plates and you want to drop the barbell while deadlifting, you’ll want to build a platform. You can buy pre-made deadlift platforms such as this one. They can be quite expensive, though, so a lot of guys choose to build them out of plywood from their local hardware store. But unless you’re a powerlifter or Olympic lifter, you don’t really need a dedicated lifting platform. I haven’t dropped a weight—either on purpose or by accident—in almost a decade.
Sample Home Gym Setups
Okay, now that we’ve talked about all the individual pieces of equipment, let me put together a few sample home gym setups that you could buy. Obviously feel free to mix and match, and remember that there may be great secondhand equipment available in your area for a substantially cheaper price.
Note for international readers: If you aren’t living in the United States, I’d recommend looking for local distributors. For example, although Rogue ships internationally, they also have Canadian, Australian, and European distributors that you can buy from. If you buy from a nearby distributor, they’re also going to favour the units of measurement that you use. For example, the European and Australian Rogue distributors favour kilos, whereas the American and Canadian ones favour pounds.
I bought my home gym from Rogue and shipped it internationally to my home in Cancun. It still wound up being cheaper than buying my equipment locally, and I wound up with higher quality equipment. I bought my weight plates from a distributor in Mexico City, though, given how expensive weight plates are to ship.
Minimalist Home Gym ($1729)
This is a classic strength training home gym that you’d see guys use for StrongLifts 5×5 and Starting Strength, but it’s also a great minimalist home gym for bulking up.
- Rogue’s R3 Power Cage ($695)
- Rogue Ohio Power Bar ($285)
- Rep Fitness Machined Plates—350lbs ($480)
- Rep Fitness Flat Bench ($169)
- Dip Belt ($49)
Beastly Home Gym—Power Cage ($1989)
This is a classic strength training home gym with a few modifications to make it better for bulking. It uses dense rubber bumper plates so that you don’t need to worry as much about noise/impact, and we’ve added in a dip bar, landmine press, and weight belt.
- Rogue’s R3 Power Cage ($695)
- Rogue Ohio Power Bar—Bright/Black Zinc ($285)
- Rogue Echo Bumper Plates—350lbs ($525)
- 5, 2.5 and 1.25-pound change plates ($105)
- Rep Fitness Flat Bench ($169)
- Rogue Infinity Matador Dip Bar ($90)
- Rogue Landmine ($95)
- Rogue Dip Belt ($49)
Beastly Home Gym—Squat Stand ($1854)
This option is very similar to the power cage version above, but it’s built around a squat stand with safety spotter arms to keep the setup more open.
- Rogue’s S2 Squat Stand ($425)
- Rogue Infinity Safety Spotter Arms ($135)
- Rogue Base Storage ($68)
- Rogue Ohio Power Bar ($285)
- Rogue Echo Bumper Plates—350lbs ($525)
- 5, 2.5 and 1.25-pound change plates ($105)
- Rep Fitness Flat Bench ($169)
- Rogue Infinity Matador Dip Bar ($90)
- Rogue Landmine ($95)
- Rogue Dip Belt ($49)
Note about the safety spotter arms: the safety spotter arms are incredibly sturdy and a joy to use, but they can only be installed in 2-inch increments, as opposed to power cages allowing for 1-inch increments. I haven’t had any issues with this, but it might make setting up for the bench press a little bit harder. If you bench with a fairly flat torso, you might need to use a slightly bigger arch. (The j-cups can still be installed in 1-inch increments, though, so it’s still easy to rack and un-rack the weight while benching.)
My Home Gym ($2284)

This is what I personally decided to buy. It’s the same as the squat stand gym shown above, just with a fully black barbell, four extra 45-pound plates, a curl bar (aka EZ-Bar), and with everything ordered from Rogue (including the bench).
- Rogue’s S2 Squat Stand ($425)
- Rogue Infinity Safety spotter arms ($135)
- Rogue Westside Power Bar—Black Zinc ($345)
- Rogue Echo Bumper Plates—530lbs ($765)
- Rogue 5, 2.5 and 1.25-pound change plates ($105)
- Rogue Flat Bench ($180)
- Rogue Infinity Matador Dip Bar ($90)
- Rogue Curl Bar ($195)
- Rogue Dip Belt ($49)
Budget Home Gym ($1078)
The cheapest way to build a good home gym is to get your equipment secondhand, but if you want to buy your stuff new, this setup should serve you well. The quality isn’t quite as high as some of the other ones, but you’re getting the same functionality for half the price. I also intentionally chose everything from the same company in order to minimize shipping costs.
- Rep PR-1000 Power Cage ($275)
- Rep Stainless Steel Power Bar ($199)
- Rep Cast Iron Plates—355lbs ($305)
- Rep Flat Bench ($150)
- Rep Landmine ($49)
- Rep Dip Belt ($30)
Premium Home Gym ($4000)
This is the home gym that you’d buy if money isn’t a barrier. It’s not necessarily any better for building muscle, but everything will be a little easier and more comfortable, and your home gym will look absolutely badass.
- Rogue’s Monster Power Cage + Strap Safeties + Sandwich J-Cups ($1365+)
- Rogue Stainless Steel Ohio Bar ($445)
- Rogue Echo Color Bumper Plates—530lbs ($909)
- Rogue 5, 2.5 and 1.25-pound change plates ($105)
- Rogue Adjustable Bench ($545)
- Rogue Monster Matador Dip Bar ($145)
- Rogue Curl Bar ($195)
- Rogue Dip Belt ($49)
- Extra Collars ($37)
Want Help? Ask Away
If you have any questions about building your own home gym, post a comment below and I’ll do my best to help. Don’t post links, though, or your comment may get flagged as spam.

